Best Freakin’ Lamb Roast Ever!

Did you ever take a bite of your dinner and hear angels sing?  If not, you need to try this lamb recipe pronto!   My tummy is still humming with delight.

We didn’t eat a lot of lamb growing up. I remember grandma making it for Easter a few times when I was pretty young, but ham became our traditional meal long ago.  I didn’t have lamb again until 6 years ago when my brother and I took our dad to Ireland.  There was quite a bit of lamb on the menu over there.  As we were there in the spring, there were oodles of new lambs in pretty much every field across the country.  This was a little off-putting when trying to order the fluffy little fellows for lunch.  Eventually I just started referring to them as “lunch” or “dinner” instead of “cute lamb” whenever we’d see one in a field.  After that, I found that I had much less apprehension about eating one.   Since then, I have eatten various lamb entrees periodically at Middle Eastern restaurants.  However, this is by far the best lamb I’ve had.

Ingredients:

1 semi-boneless lamb leg roast (mine was about 4.5 pounds) You can use boneless as well.

2 medium lemons, zested and juiced (about 2 – 2.5 Tbsp of zest)

3 Tbsp. fresh oregano, minced

3 Tbsp. fresh thyme, minced

1 1/2 tsp. sea salt

1 tsp. freshly ground black pepper

2 Tbsp. olive oil

2 – 3 cloves of garlic, sliced into slivers

1 – 2 Tbsp. fresh rosemary leaves

2 pounds carrots, cut into pieces (optional)

1 – 2 pounds turnips (I used 1 lb, but could have had more) (optional)

8 oz. button mushrooms, halved (or quartered for the big ones)(optional)

2 cups beef broth/stock (could probably use chicken or veggie broth/stock also) for bottom of roaster to keep things moist and make enough juice. (optional — if not roasting veggies, the lamb will make its own juices.)

Directions:

In a small bowl, thoroughly combine lemon zest, thyme, oregano, salt, and pepper.

Pat meat dry with paper towels.

Brush lamb with lemon juice, then olive oil, then massage in herb/seasoning mixture. Do both sides.

Using a thin paring knife, cut deep slits all over the leg.  Stuff each slit with a sliver of garlic and rosemary leaves.  Let leg warm on kitchen counter for three hours. (Because I was in a bit of a hurry, I only let mine sit out for about an hour.  It turned out fine).  Note: The lamb can be prepped an entire day in advance then simply allowed to warm up on the counter before cooking.

Pre-heat oven to 275 degrees Fahrenheit.

Put carrots, turnips, and mushrooms in bottom of roasting pan. Add 2 cups beef broth to pan (I’m paranoid about my meat drying and I wanted some extra liquid with the veggies in there).  Put rack in pan and position the leg on the rack.

Cover with aluminum foil and  roast to the desired doneness.  I cooked mine to an internal temperature of 160 degrees and it came out nicely medium.  Cook to 140 degrees for medium rare.

Remove from oven, leaving foil in place, and let rest for 15 minutes.  Meanwhile, heat oven to it’s highest setting (475 – 500 degrees).

Uncover roast, return to oven, and cook until browned – 10 to 15 minutes.
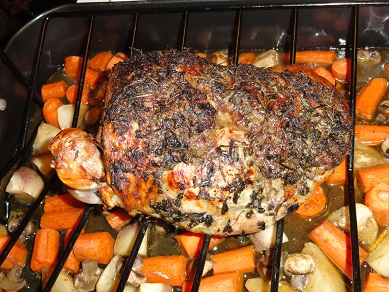
Remove from oven and let sit 15 minutes before carving.  Top meat with juices from the pan.  You can put juices in a saucepan and reduce a bit if desired.
Deconstructed Paleo Egg Roll – Challenge Accepted!

(Since posting this, I have worked on the recipe more and came up with something I’m happy with.  Here’s a link to the new recipe.)

Yesterday I fell off so far off the paleo wagon that I got run over by it!  It started with the giant assortment of fabulous gourmet popcorn that showed up from one of our vendors — I sort of fell head first into that.  Also, there may or may not have been some pizza consumed at some point.   It was the culmination of a week in which I found myself cheating more than normal.   Needless to say, it wasn’t my proudest moment.

If there is a plus side, it made me realize how easy it is to slip back into your evil old ways.  I’ve felt so much better (and lost weight) while eating paleo that I definitely want to stay with it.  I decided to recommit myself to it and no better way to do that than to whip up some fabulous recipes!  While at it, I thought I’d challenge myself to try some new stuff.

The other day in my post on shopping for spices in ethnic markets, I suggested looking around while you were there to see what inspired you.  As I typed it, I realized that I hadn’t done a lot of that myself lately.  I shop often at the Middle Eastern and Indian markets but have never been to the Asian market, so I decided to pop in there this afternoon.   I lingered for a while over the dried seaweed/kelp section before deciding that I wasn’t up to that particular challenge (you can thank me if you’d like).  Further down the aisle I found the powdered chinese hot mustard — my favorite egg roll topper.  I’ve been craving egg rolls something fierce lately, so I picked up the mustard and decided to figure out a way to make a paleo egg roll.

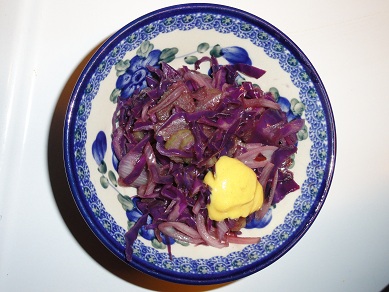
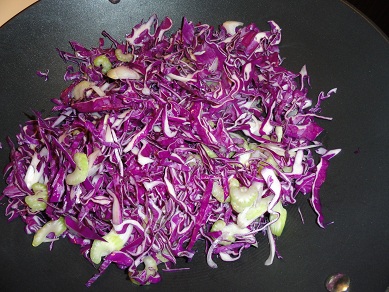
I considered using a cabbage leaf to create a paleo friendly wrap, but decided that a deconstructed egg roll might be a better/easier option.  I started by shredding a 1/4 of a small head of red cabbage (it’s what I had in the house), two stalks of celery, and a couple of shallots in the food processor.  I stir fried these in 1 Tbsp of coconut oil until the cabbage was wilted but still slightly crispy.

Shredded cabbage, celery, and shallots

I added 1 Tbsp (+/-) of coconut aminos (a paleo soy sauce alternate) and heated a few more minutes.  I then served it topped with a dollop of fresh chinese hot mustard.

Deconstructed Paleo Egg Roll - Try #1

The result was not bad for a first effort. It was definitely close enough that I think it merits another go with a few modifications.  It definitely could use a little meat.  I think I’ll add some ground pork next time — and cook the cabbage right in the pork grease.  It needed a little extra seasoning too.  Definitely a pinch of salt.  I’ve never used Chinese 5 spice blend, but think I may check that out too.  If any of you give this a try, let me know how your version turns out.

Moroccan Chicken with Cinnamon Spiked Dried Plums – Crock Pot & Stove Top Versions

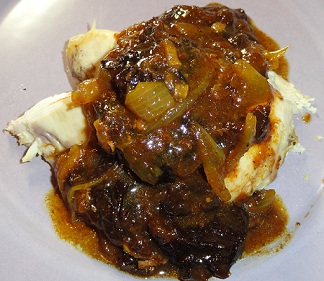
Moroccan Chicken with Cinnamon Spiked Prunes

Here’s a modified version of a recipe that hasn’t graced my table for a couple of years.  I don’t know why; I really liked it.  The original recipe comes from “The Complete Whole Grains Cookbook”, however, by simply omitting the couscous, this is paleo.  This time around I decided to use a whole chicken rather than chicken breasts.  I was also curious to see how it would work in a crock pot, so I gave it a whirl.  I am happy with the results.

The cinnamon spiked dried plums really give this dish its flavor.   Dried Plums by any other name are just prunes, but dried plums sounds so much more appetizing! The cinnamon spiked fruit makes for a sweet and flavorful sauce — and if it helps keep you regular, extra bonus!   This recipe is for the crock pot variation I made tonight.  I’ll also include the stove-top directions below the crock pot recipe if you prefer to try that.

Ingredients:

1 cup pitted prunes

1 tsp cinnamon (I recommend fresh ground if you have a spice grinder)

1 whole chicken (about 4 pounds) – rinsed and patted dry

3 onions – halved and thinly sliced

2 cloves garlic – minced

2 Tbsp fresh ginger root – minced

1 tsp ground cumin

1 tsp salt

1 tsp finely grated lemon zest

1/4 tsp cayenne pepper

1/2 tsp black pepper (fresh ground recomended)

2 Tbsp freshly squeezed lemon juice

1/4 tsp saffron threads disolved in 2 Tbsp boiling water

1 tsp honey

1/2 tsp allspice for rubbing on chicken (optional)

Toasted sliced almonds (optional)

Directions:

The cinnamon spiked prunes are made separately.  You can make them the night before or while reducing  the broth from the crock pot.

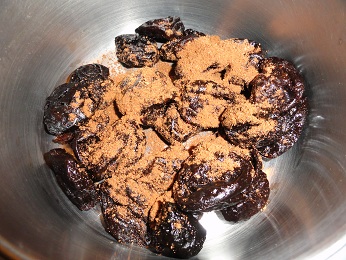
In a saucepan, combine the prunes and cinnamon and cover with cold water (Only add enough water to cover the prunes).   Bring to boil over medium-high heat.  Reduce heat and simmer uncovered until prunes are soft and water has been absorbed, about 30 minutes.  Set prunes aside (can be made the night before and stored in the fridge). ( FYI:  When I made this, I increased amount of prunes to 1.5 cups, but found it to be too much.  Stick with the 1 cup recommended in the recipe)

Prunes & Cinnamon

Place onions in the bottom of the crock pot.  Add garlic, ginger, cumin, salt, papper, cayenne, lemon zest, lemon juice, and saffron liquid.

Ingredients in the crock pot & ready for the chicken.

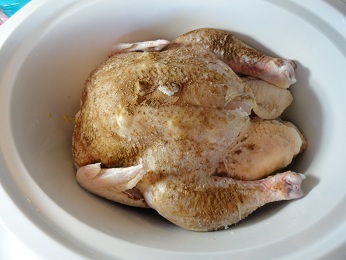
Place chicken on top of onions and spices.  Rub the allspice (optional) on the top of the chicken to give it a little color and a little extra flavor.  Crock pot contents can be assembled in the pot the night before and stored in the fridge until morning.  No need to add any liquid.  The chicken will make plenty of broth.

Allspice rubbed on top of chicken adds color and a little extra flavor.

Cook in the crock pot on low for 8 hours.  Remove cooked chicken from crock pot.  It’ll probably fall apart.  Be sure to remove all of the bones and chicken. Cover plate of chicken with foil to keep warm.

For the sauce:  Transfer contents of the crockpot (broth and onions) into a skillet or saucepan.  Cook on medium-high heat to reduce the liquid by about one-third to one-half depending on how thick you like your sauce.  Add the reserved cinnamon prunes and heat through. Spoon sauce over the chicken, garnish with almonds (optional), and serve.

—————————————————————————————————-

Stove-top Version

If you prefer to use chicken breasts (either bone-in or boneless) you can use the following stove-top directions.  Cooking time will be much less for boneless skinless chicken.

In addition to the ingredients above, you will also need 1 Tbsp of cocnut or olive oil and 1-1/2 cups of reduced sodium chicken stock.  In place of the whole chicken, use 2 pounds of skin-on bone-in chicken breasts or about 1.25 pounds of boneless skinless chicken breasts.

Directions:

Prepare the prunes as for the crock pot version above.

In skillet, heat oil in pan over medium heat.  Add chicken, in batches if necessary, and cook, turning once, until browned.  Transfer to a plate.

Add onions to skillet and cook until they begin to brown.  Add garlic, ginger, cumin, salt, lemon zest, cayenne, and black pepper.  Cook, stirring, for 1 minute.  Add lemon juice, chicken stock, and saffron liquid.  Bring to boil.  Return chicken to pan, skin side up.  Reduce heat to low.  Cover and simmer until chicken is cooked through (25 to 40 minutes).  Remove chicken from pan and keep warm.

Increase heat to medium-high and cook, stirring frquently, until mixture is reduced by 1/3.  Reduce heat to medium.  Add honey and stir well.  Add reserved prunes and cook until heated through.  Return chicken to pan, cover, and heat through.

Plate and garnish with almonds if desired.

Homemade Paleo Mayonnaise & A Cautionary Tale of Baconnaise

Being relatively new to the paleo lifestyle, sometimes I will be sharing some recipes I find that are experiments for me.  Today’s effort is mayonnaise.  In the great Mayonnaise vs. Miracle Whip debate, I am firmly in the Miracle Whip camp.  I come from a long line of Miracle Whip lovers.  My great-great-great-great grandfather lugged around a giant block of ice so that he could have a supply of Mircle Whip durring his campaigns in the Civil War.  O.K., that last bit isn’t true, but Miracle Whip is practically in my genes.  It is one of the non-paleo foods still in my fridge.  However, I have been determined to try to get rid of it.  As a result, I have been playing around with homemade paleo mayonnaise.  I found some great recipes on the Paleo Diet Lifestyle website including one I’m sharing below for homemade mayo.    In the paleo version you replace the soy oil with a 50/50 mix of olive oil and coconut oil.

The results are O.K.  Does it compare in flavor with Miracle Whip (which I know isn’t real mayo) or Helman’s?  No.  Just tasting it straight up, I didn’t either like or hate it but found it to taste pretty oily.  However, when I spread it on my bacon wrap I found the taste to be much better when mingling with other flavors.   So, its not bad, but I am hopeful that this will work out even better with a little more experimentation.  Subsequent to finishing the mayo this morning, I found another site that stresses that using regular olive oil and not extra virgin olive oil is important so that it doesn’t have a strong olive oil taste.  I used Bertolli EVOO and didn’t think it was OVERLY olive oily, but I’ve long suspected the Bertolli olives are not quite as virginal as they pretend to be — the tramps!  Nonetheless, next time I make this I will use a different oil and see if the flavor changes.

Bacon Wrap with Homemade Paleo Mayonnasie

Technically, this is the second time I have attempted a homemade mayo.  The Paleo Diet Lifestyle site also said animal fats, such as bacon fat, can be used to replace the oil in the recipe.  Immediately I was drawn to trying to make it with the bacon fat.   The resulting product, baconnaise, sounds fabulous in theory — who doesn’t like mayo with their BLT? — but tasted horrible.   Baconnnaise = epic fail.  Blech!  It really just tasted like bacon grease and there wasn’t anything I could add that seemed to change that.   I think I’ll stick with non-animal fat versions for now.

PALEO MAYONNAISE

Ingredients:

2 egg yolks

1 tsp dry mustard (optional)

3 tsp lemon juice

1/2 cup olive oil (see note in my post above about EVOO)

1/2 cup coconut oil – melted

Directions:

Most recipes I’ve seen say this can be made in a blender or food processor. Several tries (and several wasted eggs) later I discovered that both my blender and food processor had too large of gaps under the blade to make mayo.  The eggs settled under the blades and nothing mixed.  I finally dug out my Kitchenaid stand-mixer and it worked perfectly.   A hand mixer, or possibly an immersion blender, would also work well.  Hand whisking is doable, but seems like a lot of work.  On a somewhat unrelated note, I sold an antique mayonnaise maker on Ebay for $700 a few years ago.  I wonder how that would have worked?  One thing is for sure —that would be some expensive mayonnaise!  On with the recipe…

Put the yolks in the mixer bowl  with the mustard (if using) and 1 tsp lemon juice and mix those ingredients together;

Start whisking vigorously (mixer speed setting medium low to medium) while dripping the oil very slowly, even drop by drop in the beginning. You’re creating an emulsion and if you put too much oil at once, it will separate and will be very hard to save. Whisk non-stop;

As you add more oil, the emulsion will form and the mayonnaise will start to thicken and you can pour the oil faster at this point (but still drizzle in relatively slowly);

When all the oil is incorporated and the mayonnaise is thick, add the rest of the lemon juice and taste your creation.  I used a spatula at this point to scrape any splashed oil off the side of my mixing bowl to be sure it got mixed in.   You can season to taste with salt and pepper.  (Be a little careful with the salt.  I found it got very salty very easily.)  I also added 1/8 tsp dried thyme for a little extra flavor.  You can experiment with other herbs that will complement what you are serving it with.

Homemade Paleo Mayo

It makes about 1-1/4 cups.  Store in fridge for 1 – 2 weeks.

Accidentally Paleo Meatloaf

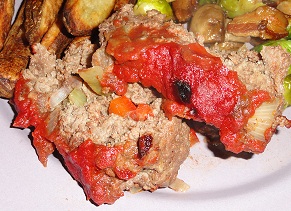
Paleo Meatloaf

I’ve been in a comfort food mood the last few days — probably due to the sudden change in our weather from the unusually warm 60 degree days, back to the normal Ohio gloom and chill.  In particular, I’ve had a hankering for meatloaf (the food, not the singer) for several days now, so I decided to share my recipe with you all.  I switched up my meatloaf recipe a couple of years ago (long, long before I even heard of paleo) to a version without bread crumbs.  I’m sure that first time it had more to do with the fact that I had no bread in the house than to a conscious desire not to include bread, but sometimes even a blind rabbit finds a carrot.   In this version I substitute white mushrooms for the bread crumbs.

I always used ketchup as a topper for the meatloaf, however, since the store-bought variety isn’t paleo, I decided to wing it and come up with something a little better.  This topper isn’t bad, but I’m gonna keep working on it.  I want to try my hand at homemade paleo ketchup, so it may end up reverting to ketchup eventually.

O.K. everybody, let’s throw a little Meatloaf on the stereo (the singer, not the food) and get cooking!  Sing it with me now… Though it’s cold and lonely in the deep dark Ohio night, I can see  taste paradise by the dashboard kitchen light, Paradise by the dashboard kitchen light…

Ingredients:

2 lb lean ground beef

4 cloves garlic – chopped

6 oz. white mushrooms ( finely chopped in food processor to about the size of coarse bread crumbs.  Careful not to over process or they will get mushy)

3/4 c. onion – chopped

3/4 c. red bell pepper – chopped (may substitute green, but I prefer the sweeter colored bells)

2 eggs

2 Tbsp chopped fresh parsley

salt and pepper to taste

1/2 – 6oz. can tomato paste

1 Tbsp honey

Directions:

Thoroughly mix everything except tomato paste and honey in a large bowl.  Arrange meat in your baking dish.

Meatloaf arranged in pan --- When cooking in the microwave, be sure to shape in a ring

In a small bowl mix the tomato paste and honey and a little salt to taste.  Spread mixture evenly over top of meatloaf.

 I have always cooked my meatloaf in the microwave.  To cook in the microwave, place meat mixture in a ring in a microwavable baking dish.  If you shape it into a giant loaf it won’t cook in the middle.  I have a Tupperware pan with a lid.  My grandma always used a coring ware dish with a glass lid.  You definitely want to cook it with a lid on to help it cook evenly.  If you don’t have a lid, use plastic wrap.  In a 1000 watt microwave, meat and veggies cook at 6 minutes a pound, so this meatloaf will take about 14 minutes.  Let sit for several minutes before checking doneness.  You may need to adjust the time based on your microwave.  As an alternate you can use a loaf pan and bake in the oven.

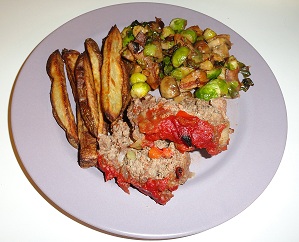
Meatloaf with oven-baked fries & brussels sprouts

Brussels Sprouts with Bacon, Mushrooms, & Shallots

I was feeling a little guilty for revealing in yesterday’s post that I used to think that brussels sprouts were the work of the devil.  To atone, I am dedicating this post to the little green fellas (and to Wade Jennings who claims that not even bacon can make brussels sprouts appealing).  On their own they are still not my favorite veggie so a little something something is necessary to give them a boost.  The special somethings in this case are sautéed mushrooms and shallots and a little bacon.  Bacon makes everything better (this is a proven fact) and there are few things that I like better in this world than sautéed mushrooms.  How can adding both be anything less than fab?  Although I may never enthusiastically embrace brussels sprouts like a long-lost relative in a tear jerking Folgers Coffee commercial,  it is good enough to make me want to give them a hearty whack on the back like an old college drinking pal I don’t mind seeing every now and then.  Seriously, this is pretty darn good.  For those that don’t care for the taste of sprouts, cutting them into smaller pieces lets more of the other flavors permeate and you get less brussel sproutiness.   And yes, sproutiness is a word.

Without further ado…

Ingredients:

5 – 6 slices bacon

2 Tbsp Grass-fed butter

8 oz. white mushrooms – quartered or thick slices

4 medium shallots

2 cloves garlic – chopped

16 oz. Brussels sprouts – ends trimmed and quartered (halved if they are tiny)

Salt & pepper to taste

Directions:

Cook bacon to the desired degree of doneness (I like mine crispy).  When done, remove from pan and set aside to cool.  When cool, break bacon into smaller pieces.

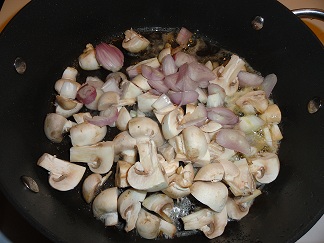
Remove all but 1 Tbsp of the bacon grease from the pan.  Add 1 Tbsp of the butter, shallots, mushrooms, and garlic to pan and saute on  medium high heat until shallots become translucent and mushrooms start to brown.

Mushrooms & Shallots

Ready for the sprouts!

Add remaining 1 Tbsp of butter and brussels sprouts.

w/ sprouts added

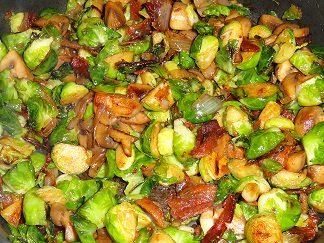
Cook, stirring occasionally,  until sprouts are tender (about 8 to 10 minutes).  When tender, add bacon, stir to mix, and heat for a few more minutes to spread flavor.  Salt and pepper to taste & serve.

All Done! Doesn't it look yummy?